this is a temporary page for the hackergotchi ribbon tutorial
Creating a new hackergotchi ribbon
This is a small tutorial explaining how to create your own hackergotchi ribbon! They're meant to be used on the Planet, to show your participation in a certain event (for instance, you're a student in the Google Summer of Code, or you're going to FUDcon this year...).
Setup
First, download the [Media:HackergotchiRibbon.svg hackergotchi ribbon source].
This tutorial will use Inkscape 0.47 to edit the SVG file. Install it from the repositories or download it from the Inkscape website.
Editing the text
- Open the source file with Inkscape.
- If the frame isn't in the middle of the screen, press 5 to center and enlarge the page. Pressing 1 after that will zoom out to 100%.
- Double-click the text and edit it to your liking.
Changing the color
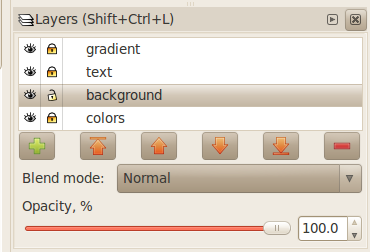
- On the toolbar, press the Fill and Layers buttons (both are shown below). This will open the both the Fill and Stroke panel and the Layers panel on the right side.
- Click on the lock icon in front of the "text" layer to lock it, then click the icon for the background layer to unlock it. In short, it should look like the screenshot below.
- Click on the ribbon to select the background image.
- Adjust the color wheel on the Fill and Stroke panel to your liking.
- If you want to use one of the official Fedora colors, select the background image and use the eyedropper tool on the left side to select one of the colors on the left.


